This blog post will show you the specific steps needed to add a Power BI Report to a custom web application using the Microsoft Power BI Embedded Service and configure Row Level Security. Fortunately, Microsoft has provided an updated sample application using MVC and the released version of Power BI Embedded. Using this as a start we will then dive deeper and incorporate Power Bi’s version of Row Level Security.
Before you start, you will need a number of items.
1) A Power BI report created using Direct Query
2) A subscription to Microsoft Azure
3) Microsoft’s Provision Sample application
4) A MVC application in Visual Studio
5) The appropriate NuGet packages
Upload a Power BI file to your Azure Power BI Embedded Service.
To begin, you will need to create a Power BI report, or find a sample PBIX file, preferably using Direct Query to Azure SQL database or DW. You can find my sample PBIX file using Direct Query here. While this report can use an imported (cached) dataset, you will not be able to update the data of an imported dataset unless you republish the report resulting in a new report id.
If you are using my sample PBIX file, you will also need to publish a copy of my database (located here) to your Azure subscription and make note of the connection string. After publishing the data, you will need to change the data source of the PBIX file to match the location of your data.
With your report ready to go, head to your Azure portal and add a new Power BI Embedded service to your subscription. When adding this you will need to provide it a name, which will become the name of your Power BI Embedded Workspace Collection. In addition to a name you will need to provide a region, to keep costs down you should keep this in the same region as your App Service and Azure SQL Database. Next you will need to copy one of the Access keys from the newly created collection.
With this information in hand you can move to the next step.
Use the Provision Sample application.
Next up is to download the Provision Sample that Microsoft has provided via github at https://github.com/Azure-Samples/power-bi-embedded-integrate-report-into-web-app/. The Provision Sample will give you a number of options, you will need three of them to complete your Azure setup. Make sure you have the Provision Sample set as your start up and run the console application. The first 4 steps are not needed; you can jump to step 5.
Step 5 or Provision a new workspace in an existing workspace collection, will require you to enter your Collection Name and Access Key from above and return a Workspace ID.
Step 6 or Import PBIX Desktop file into an existing workspace, will require you to enter your Collection Name, Access Key and Workspace ID if not already done in previous steps along with the location of a PBIX file and Dataset Name, which will also be your report name in the Workspace.
Step 7 or Update connection string info for an existing dataset, will require your Collection Name, Access Key and Workspace ID if not already done in previous steps along with the username and password for your Direct Query database connection. After you provide the username and password you have the option to enter a new connection string for your Dataset to allow your Embedded report in Azure to have a different connection than your local report.
Format your connection string as:Data Source=tcp:YourServer.database.windows.net;Initial Catalog=YourDBName;User ID=YourUserName;Password=YourPassword
You are now done with your Azure Power BI Embedded service setup and can add code to your application to embed your report in your application.
Do you really want to use the Power BI Embedded service?
To embed, embed or embed?
A quick question to make sure you are doing the right thing, now that you have done all the Azure Embedded work. The Azure Power BI Embedded service allows you to embed your Power BI reports into your application and bypass the Power BI authentication and licensing rules. This doesn’t mean there is not a different set of rules, but as long as your users are not internal they will not need a Power BI license or login and you will pay for usage via the Azure Power BI Embedded service rules.
See the Microsoft site for current pricing: https://azure.microsoft.com/en-us/pricing/details/power-bi-embedded/
If you want to use your application with users in your company as an internal application, the Azure Power BI Embedded service is not your best choice. If you use the Embedded service you will need to pay both the monthly user license fee, plus the embedded service fee in addition to any application service, database and data transfer fees. The ideal application is a SaaS application that services users outside your company.
The Power BI API also supports adding a report or even just a tile from a Power BI report by authenticating to the Azure Active Directory, and this will be the topic of another blog post. This is ideal for internal applications where you have users who already have a Power BI account.
Power BI also supports embedding your report by publishing it to the web first, which will make it and all the data public. This feature is great if you just want to show off your Power BI skills or have data that you want to share with the world.
Onto your application and NuGet
Now that Azure is ready to go, you can open your existing application, and for both MVC and Web Form applications I will walk you through the steps needed to embed your report. First up is to install the needed NuGet packages.
Make sure the following items are installed:
Install-Package Microsoft.PowerBI.Core
Install-Package Microsoft.PowerBI.API
Install-Package Microsoft.PowerBI.JavaScript
Install-Package Newtonsoft.Json
Install-Package Microsoft.Rest.ClientRuntime

//For MVC, also add the following item:
Install-Package Microsoft.PowerBI.AspNet.Mvc
Once your NuGet packages are installed you can start to prep your application.
MVC Application
Microsoft provides a sample MVC application, and this is a good place to start. However, I recommend you start with your existing MVC application or just create a new MVC application and follow the steps below to add Embedded to your application.
First you need to provide the Azure information you collected above to your application. The embedded sample application does this via the Webconfig, and this works well as these items can be left blank for security and provided via the Azure portal in your application service. Storing them in the database would be another good choice for these items.
Web.config
<appSettings>
    <add key="powerbi:AccessKey" value="" />
    <add key="powerbi:ApiUrl" value="https://api.powerbi.com" />
    <add key="powerbi:WorkspaceCollection" value="" />
    <add key="powerbi:WorkspaceId" value="" />
</appSettings>
You will then need to start the process by calling your controller on a page or menu in your application. The only current way to access your ReportID is to query the Power BI Embedded API using the GetReports or GetReportsAsc methods. The Microsoft sample application has a demo of how to do this using the ReportsViewModel, here is a resulting link example to start the process:
<a href="/Report/Report?reportId=YourReportID">Dashboard</a>Once you have your Azure information in your application via the web.config, you need to create a Power BI object and create a token in your controller class. The sample application uses two report models, one to store the collection of reports and provide Report IDs and the other to store the security token. You only need the later Report model in your application once you have the Report ID. The Report IDs can be managed in your database or via other means.
Create a Model to handle your Report:
using Microsoft.PowerBI.Api.V1.Models;

namespace EmbeddedTestApp.Models //ReplaceWithYourNameSpace.Models
{
    public class ReportViewModel
    {
        public Report Report { get; set; }
        public string AccessToken { get; set; }
    }
}
The first thing to do in your controller is create your using directives:
using System;
using System.Collections.Generic;
using System.Linq;
using System.Web.Mvc;
using System.Configuration;
using Microsoft.PowerBI.Api.V1;
using Microsoft.PowerBI.Security;
using Microsoft.Rest;
using System.Threading.Tasks;
using EmbeddedTestApp.Models; //ReplaceWithYourAppClassName.Models;
Then create and set properties in your controller class:
        private readonly string workspaceCollection;
        private readonly string workspaceId;
        private readonly string accessKey;
        private readonly string apiUrl;

        public ReportController()
        {
            this.workspaceCollection = ConfigurationManager.AppSettings["powerbi:WorkspaceCollection"];
            this.workspaceId = ConfigurationManager.AppSettings["powerbi:WorkspaceId"];
            this.accessKey = ConfigurationManager.AppSettings["powerbi:AccessKey"];
            this.apiUrl = ConfigurationManager.AppSettings["powerbi:ApiUrl"];
        }
The important code for your MVC application is to create a call to your controller in your view and then process the request by creating an instance of IPowerBIClient using a token based on your accessKey. The created object can then be used to create the report token used generate the report using the CreateReportEmbedToken method. The key pieces of information needed are the Workspace collection name, the Workspace ID and the Report ID which is found in the sample by using the GetReportsAsync and GetReports methods.
Create the PowerBIClient in your controller:
        private IPowerBIClient CreatePowerBIClient()
        {
            var credentials = new TokenCredentials(accessKey, "AppKey");
            var client = new PowerBIClient(credentials)
            {
                BaseUri = new Uri(apiUrl)
            };
            return client;
        }
Process the request from your view:
        public async Task<ActionResult> Report(string reportId)
        {
            using (var client = this.CreatePowerBIClient())
            {
                string myUserID = User.Identity.Name.ToString();
                IEnumerable<string> myRole = new List<string>() { "Customer","Developer"};
                var reportsResponse = await client.Reports.GetReportsAsync(this.workspaceCollection, this.workspaceId);
                var report = reportsResponse.Value.FirstOrDefault(r => r.Id == reportId);
                var embedToken = PowerBIToken.CreateReportEmbedToken(this.workspaceCollection, this.workspaceId, report.Id, myUserID, myRole);
                var viewModel = new ReportViewModel
                {
                    Report = report,
                    AccessToken = embedToken.Generate(this.accessKey)
                };
                return View(viewModel);
            }
        }
Finally, you need a view to display your report:
@model EmbeddedTestApp.Models.ReportViewModel
@{
    ViewBag.Title = "Report";
}
@section Breadcrumbs {
    <ol class="breadcrumb navbar-breadcrumb">
        <li>Reports</li>
        <li class="active">@Model.Report.Name</li>
    </ol>
}
<div class="side-body padding-top">
    @Html.PowerBIReportFor(m => m.Report, new { style = "height:85vh", powerbi_access_token = Model.AccessToken })
</div>
That’s it, you can now call a report, your controller will handle the Power BI Embedded logic using your model and pass the results to your view.
Row level security (RLS) with Power BI Embedded
Additional information can also be sent to CreateReportEmbedToken for RLS to work. In this case you would need to create a user string and role list. The user string would typically be an email or other identifying characteristic of your user that is stored in your application or retrievable from your database. The user string is then sent to the Power BI Embedded service and used in the report to enable row level security by use of the username() DAX expression. The role is used to determine which rule to apply to your user string and which column in which table to base it on, it is not a group of users.
The most basic use of row level security is to take your username() from your token and pass it directly to a column in your database by creating a rule. This rule is then given a name, called a role, that is also part of your token, using a list. Each user can have as many roles as needed. Each role will then allow Power BI to determine if your user has access to the data. Access is determined using the least restrictive method applied via an “or” operator.
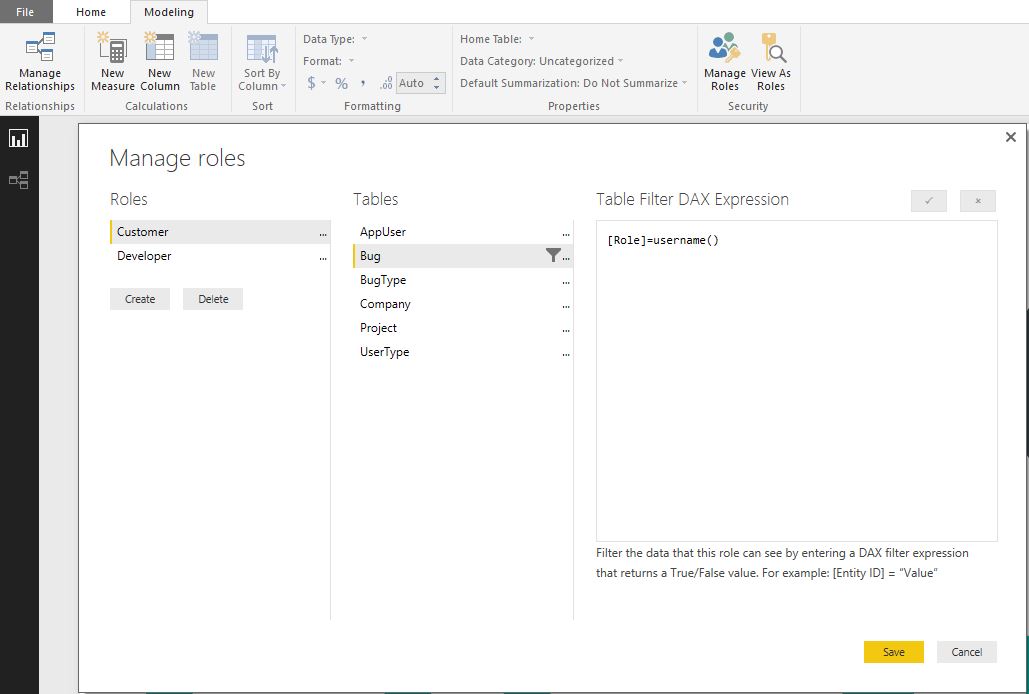
In Power BI desktop, open your report and select the modeling tab. Then select manage roles, the role in this case is called Customer and is identified by the Bug table and the [Role] column. Note that for this basic case a role is just used to identify the column that will store your user string and the rule is just used to set column = username().
More complicated rules are possible as long as you can come up with a function that accepts username() and applies it to your database via a DAX expression. You use of rules will be determined based on the list of roles that you send to your token. In addition to complicated DAX expressions, you can also create application or database based keys that are sent via the user string in the token and passed to the username() function in DAX. Any match of username() and column you create will allow access to your data in a least restrictive manner.
More embedded application samples
If you are interested to see what the Azure Embedded service can do for your application, I encourage you to check out my two favorite Microsoft samples. These samples include more detailed reports and show a more finished product as compared to the starting point.
- Northwind Traders Engine Diagnostics
- Northwind Traders Sample App