Summary
In part one of this post we created the (very) basic application and did all of the configuration steps needed to integrate Azure and Team Foundation Service so that we got continuous integration working meaning that any check-in of updated source code causes a new TFS build to be queued and the result of that build deployed to the Azure web site.
In this part we will focus on various configuration tasks, specifically:
- Branching the code in TFS to separate the version 1.0 code from the code under active development
- Creating a build definition for the version 1.0 branch based on the existing build definition
- Creating a separate development version of the web site so developers can work on version 2.0 without impacting version 1.0
Part three of this post will return to more specific coding tasks and will also cover how to handle different configuration settings in the different environments (local development, the development site and the production site).
Prerequisites
You will need to have these resources already configured:
- An Azure account, you can sign up for a free trial here.
- A Team Foundation Service account, it’s free and you can sign up here.
- Visual Studio 2012 (you can also use 2010).
- The Azure SDK, download here.
- TFS Power Tools for Visual Studio, download here.
It’s also helpful if you’ve followed all of the steps from part one of this post where the basic application was created and Azure and TFS configured for continuous integration builds.
Branch the Source Code
In order to keep track of the different versions of our web site, the first step we’re going to take before adding new features to the application is to branch the current Main branch to a Version 1.0 release so that we can roll back to that if necessary (or even to do bug fixes to a version 1 production environment while version 2 is under development).
There is nothing special about branching in this particular case. Start by launching Visual Studio and go to the Source Control Explorer window. To create a new branch you must specify the location of the new branch and while you can use any structure you care to, in the interest of keeping things obvious we’re going to create a Releases folder and put each version branch in that folder.
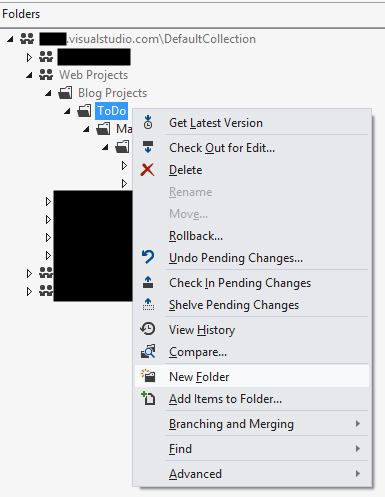
Figure 1 Creating the Releases folder
In the TFS folder structure, right-click the top-level ToDo folder (the parent of the Main folder) and select New Folder form the context menu. Name the new folder Releases and check this new folder in so that it’s available when we create the new branch next. With the Releases folder checked in, right-click the Main folder and select Branch from the context menu to create the Version 1.0 branch:
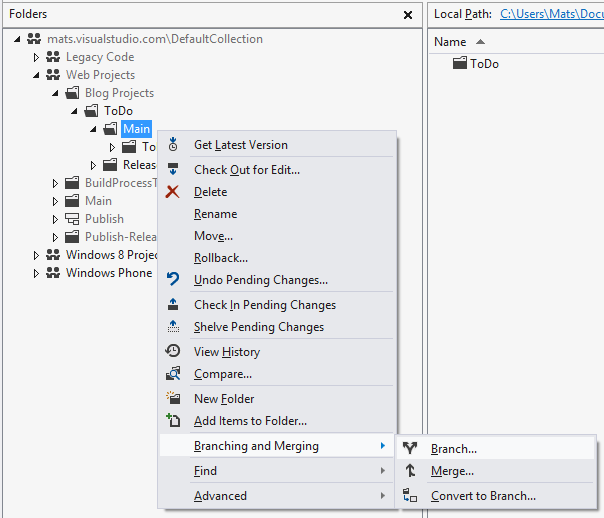
Figure 2 Creating a branch from the Main branch
Visual Studio displays a dialog asking for where the branch should be created. You can use the Browse button to select the newly created Releases folder as the location for the branch and then enter Version 1.0 as the name of the branch itself:
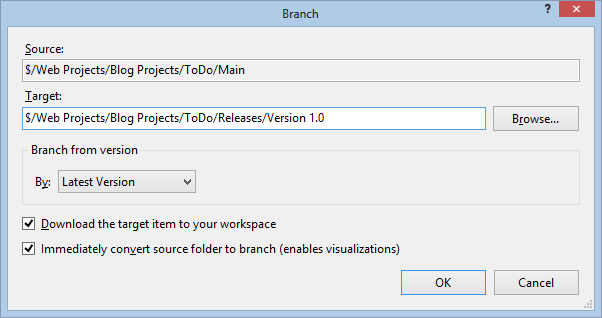
Figure 3 Specifying the location and name of the new branch
Click the OK button to create the branch. The branch is created locally so once the process has completed you must go to the Pending Changes section in Team Explorer and check in the new branch:
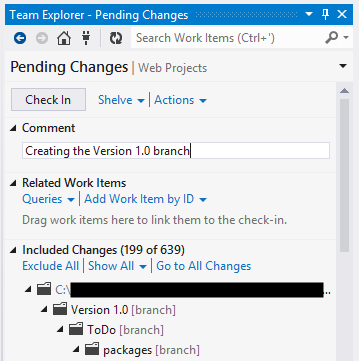
Figure 4 Checking in the new branch
Create a Build Definition for the Version 1.0 Branch
The last step before we’re done with the Version 1.0 branch is to make sure we still have the ability to build and deploy version 1.0. The one build definition we created in part one of this post builds and deploys the source code from the Main branch so we need to create a new build definition.
Creating a copy of an existing build definition is very easy if you have the TFS Power Tools installed (see the link at the beginning of this post). Go to the Builds portion of the Team Explorer window, right-click the build created in part one (todo-demo_CD in our screenshots) and select Clone Build Definition from the context menu:
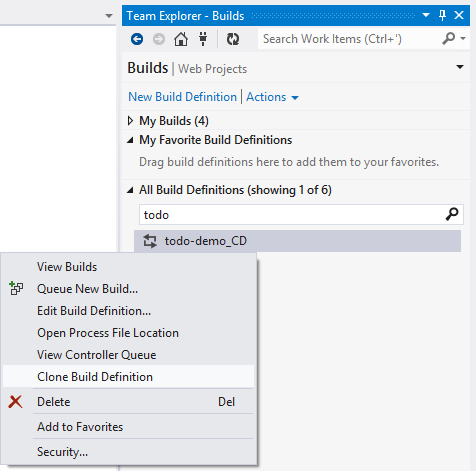
Figure 5 Cloning a build definition
Once the build definition has been created, Visual Studio opens the new build definition where you can edit it. The first step is to give it a new name, for instance todo-demo Version 1.0. On the Trigger tab change the build trigger from Continuous Integration to Manual (this isn’t necessary, your circumstances will determine what the most appropriate trigger is).
The first important change to the new build definition is on the Source Settings tab. This is where we define what source code the build controller should use to build the web site. Click the Source Control Folder field and then the little browse button that appears to change the source control path from the Main branch to the Version 1.0 branch:
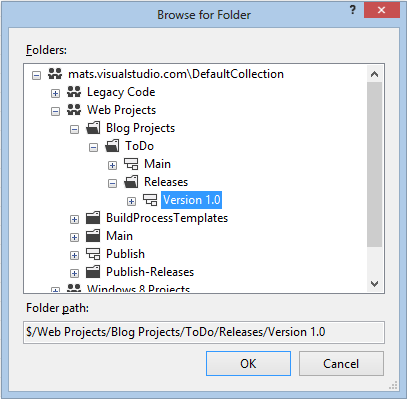
Figure 6 Selecting the source folder for the Version 1.0 branch build definition
The Build Agent Folder can remain the same as that just indicates where on the build agent the files will be copied.
The other change that’s needed is to specify the solution and publish settings needed to build version 1.0. Go to the Process tab and make these changes:
Solution to Build: $/Web Projects/Blog Projects/ToDo/Releases/Version 1.0/ToDo/ToDo.sln
Web Deploy Publish Profile: $/Web Projects/Blog Projects/ToDo/Releases/Version 1.0/ToDo/ToDo/Properties/PublishProfiles/todo-demo – Web Deploy.pubxml
When done, the Process tab should look something like this:
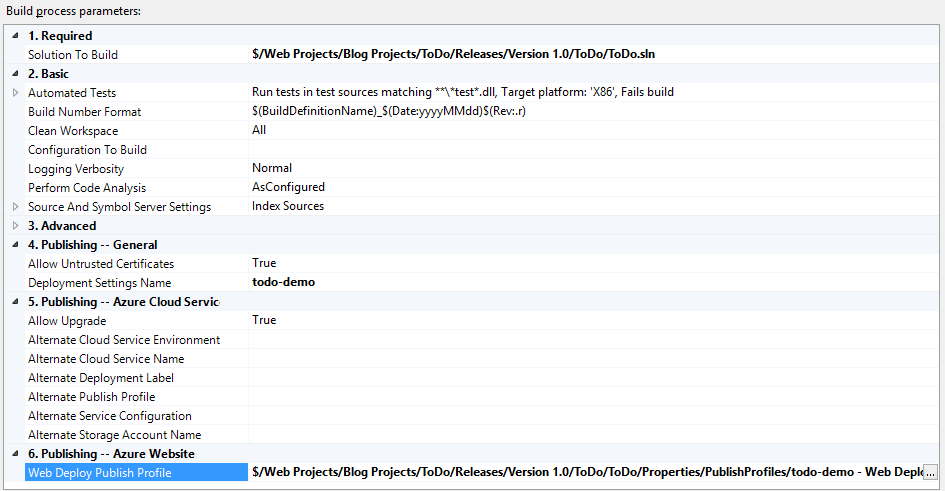
Figure 7 The build process for the version 1.0 build definition
You can now save the changes to the build definition and queue a new build to verify that it works. After the build completes and the version 1.0 web site has been deployed, go to the Deployments tab for your web site in the Azure Management portal. Here you’ll see a list of all the deployments that have been made, including that the current deployment is the version 1.0 build that just completed:
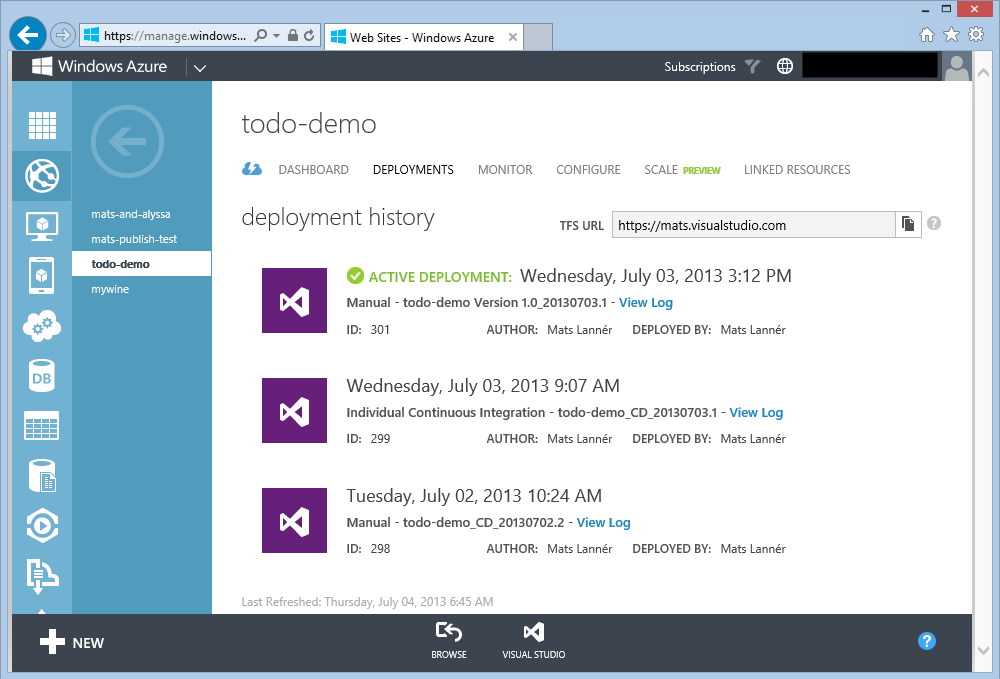
Figure 8 Web site deployments.
Create a Development Web Site
Now that version 1.0 of the web site is in production, it’s useful to have a web site we can use to do development of version 2.0 so we can do testing on Azure and get continuous integration for development purposes without impacting any users who are using version 1.0 in production.
It’s worth noting that in a real-world scenario you would typically create the production and development web sites pretty early in the project, long before you put version 1 into production.
Create the Development Web Site
Open up the Azure Management portal and create a new web site. In our screenshots below we’re calling it todo-demo-dev to distinguish it from todo-demo which is our production site. See part one of this post for instructions on how to create an Azure web site.
Once you have created the development web site, go to the dashboard for it and download the publish profile for it, just like we did in part one. This publish profile will be used to setup continuous integration from the Main branch (where we’re doing active development for version 2.0).
Configure Deployment to the Development Web Site
With the development web site created we need to make sure we can publish from the Main branch to the development web site. Just like in part one, we’ll start with a manual publish from Visual Studio.
Start Visual Studio and open the Main branch version of the solution. Right-click the ToDo project in the Solution Explorer window and select Publish from the context menu. You’ll notice that Visual Studio defaults to the publish profile we imported in part one.
Click the Profile tab on the left side of the Publish Web dialog and then click the Import button to import the publish profile for the development web site:
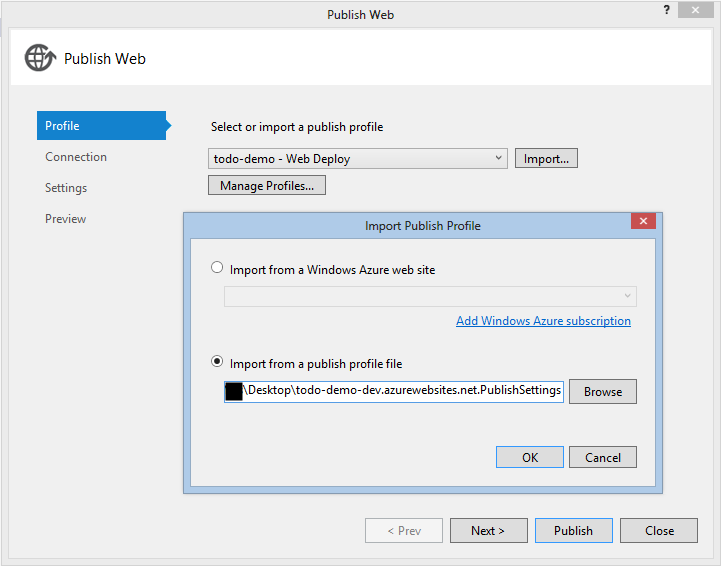
Figure 9 Importing the publish profile for the development web site so we can deploy there instead of to the production web site
After the publish profile has been imported the Publish Web dialog now shows that it will publish to the development web site instead of the production web site:
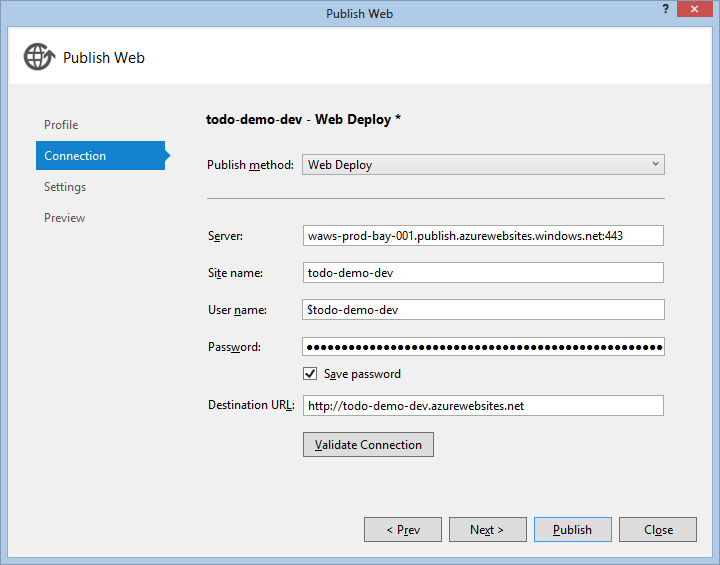
Figure 10 Publishing to the development web site
You can now click the Publish button to deploy the Main branch version of the web site to the development web site. Visual Studio has now added the new publish profile to our project, check this in so it’s available to use when modifying the build definition in the next step.
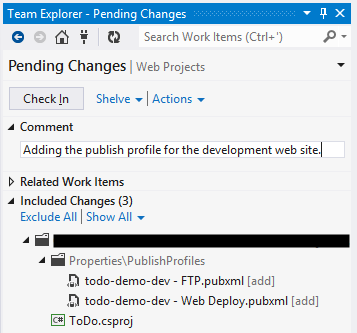
Figure 11 Checking in the publish profiles for the development web site
Configure Continuous Integration for the Development Web Site
In order to get all aspects of the continuous integration builds for the development web site working correctly we’ll repeat the process from part one, setting up deployment from source control for the development web site in the Azure Management portal and then modifying the build definition that gets created. See part one of this post if you need a reminder for how to perform these steps. After the development web site has been configured, go back to Visual Studio and go to the Builds section of Team Explorer. Under All Build Definitions you’ll now find the new todo-demo-dev_CD build definition:
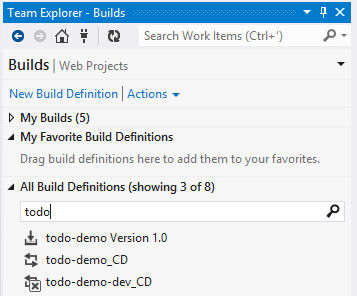
Figure 12 The new build definition for the development web site
Start with right-clicking the old todo-demo_CD build definition, select Edit Build Definition from the context menu and disable it by setting the Queue Processing to Disabled in the General tab:
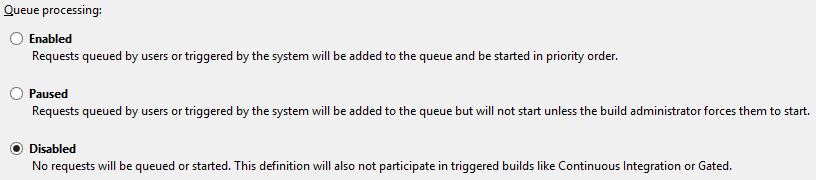
Figure 13 Disabling the old build definition
This ensures that we won’t accidentally deploy anything from the Main branch to the production web site. Save the changes and close the build definition and open up the new todo-demo-dev_CD build definition for editing.
Just like in part one, we’ll make the following changes:
- On the General tab, enable the build
- On the Source Settings tab, only download the source code from the Main branch
- On the Process tab, select the ToDo solution from the main branch as the solution to build
- On the Process tab, select the publish profile for the development web site
The last change is important as this makes sure that we deploy to the development web site instead of to the production web site. The build process parameters should look something like this when you’re done:
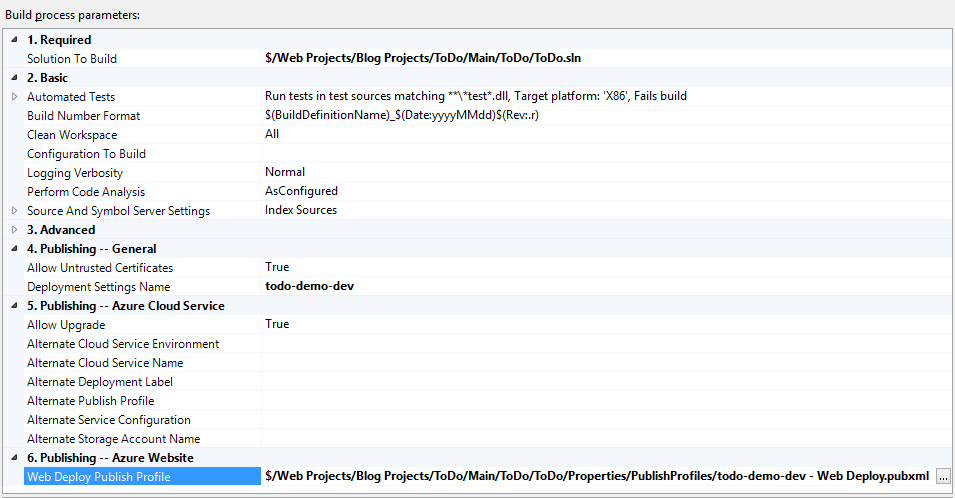
Figure 14 Build process parameters for the new Main branch build definition
Test the new Build Definition
To quickly verify that the new build definition is working, open the Main branch version of the solution in Visual Studio and open _Layout.cshtml in the Views | Shared folder.
In the `
<p class="site-title">@Html.ActionLink("To Do", "Index", "Home")</p>
to:
<p class="site-title">@Html.ActionLink("To Do v2.0", "Index", "Home")</p>
Save the changes and check them in to trigger a new build and deployment.
After the build and deployment completes, open up both the production and development web site and note that the production site is unchanged while the development site contains the small change we did:
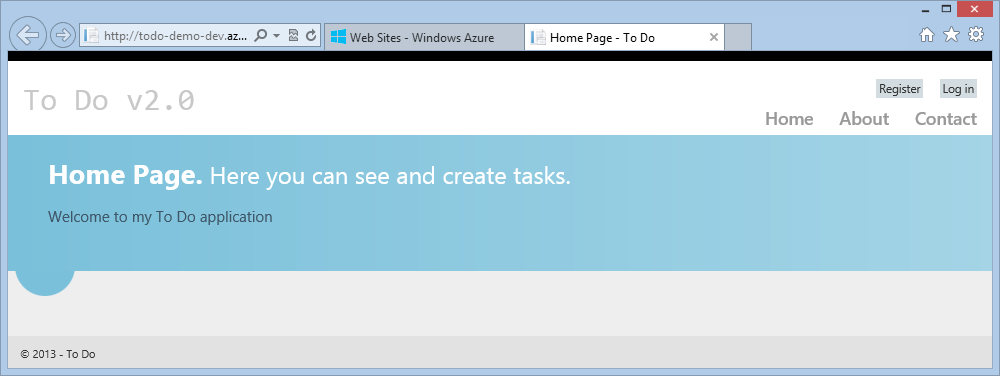
Figure 15 Updated development web site
This completes the configuration tasks for part two. Part three will cover adding database functionality to the application and handle the different database configurations in our different environments.